SCR Calculator User Manual
Version 1.17 Last modified 2025-4-6
Step 1: Import Allocation
The SAA form supports "multi-instance" functionality, allowing you to open multiple independent instances. However, closing an instance will discard all associated data.
When opened, the form initially appears blank, with only three buttons available:
Import Method 1: Independent Import
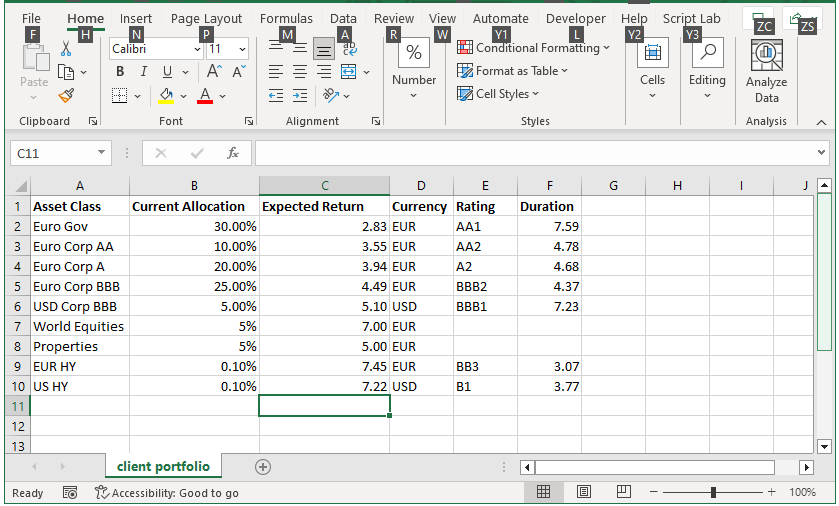
Prepare a standalone allocation spreadsheet with at least the following fields: asset class, current allocation, currency, duration, and rating. Including an additional column for Expected Return is recommended, as shown below:
This sample inputsheet above is also available for download via Menu → Help & Demo Inputs → Demo Inputsheets → Spreadsheets for the Allocation Optimiser → Allocation Table.
Once the inputsheet is ready, you can use the "Import Table" button to import it into the SAA form.
Note that we entered the US HY expected return as its EUR hedged value of 7.22.
Import Method 2: Pull from the Portfolio SCR Form
Build a model portfolio in the Portfolio SCR form and click the "Pull Portfolio" button in the SAA form.
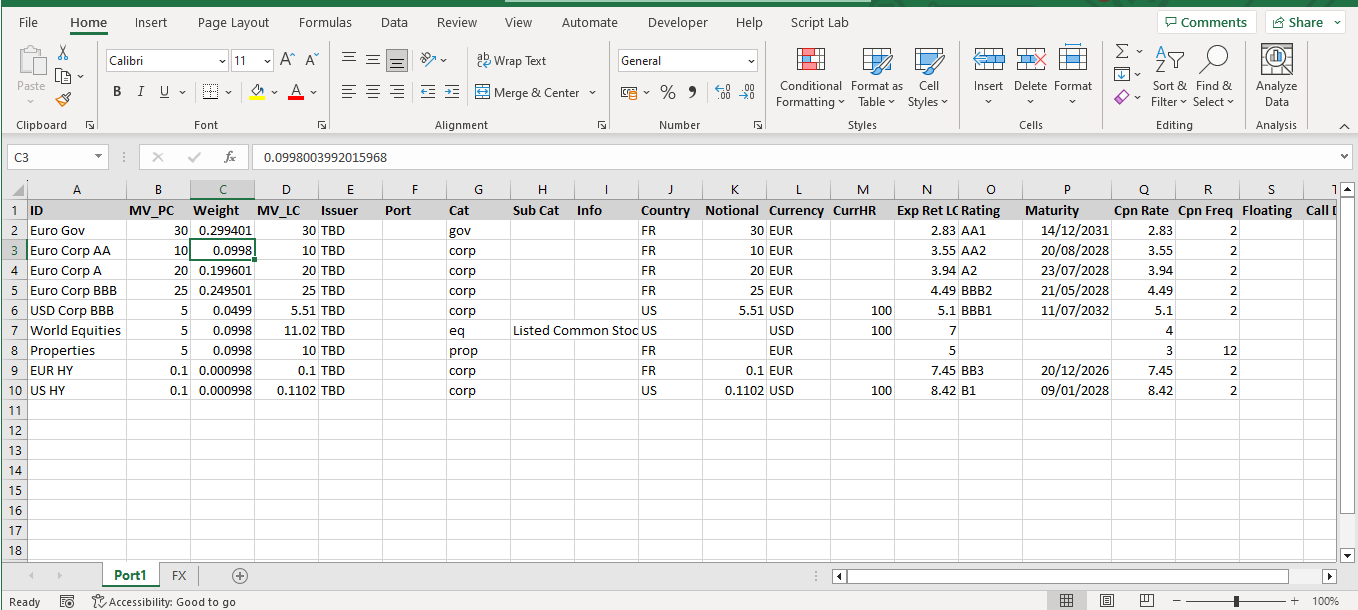
Below is an example of a model portfolio inputsheet:
This sample inputsheet above is also available for download via Menu → Help & Demo Inputs → Demo Inputsheets → Spreadsheets for the Portfolio SCR Form → Model Portfolio Inputsheet.
Note: The FX tab includes a 120bps hedging cost from USD to EUR. For US HY, assuming 100% FX hedging, the expected return is reduced from 8.42% in USD to 7.22% in EUR in the SAA form.
For model portfolios with more than 10 rows, the calculator prompts you to aggregate by "Cat Code" or "Port Code," simplifying large, granular portfolios before optimisation.
After Import
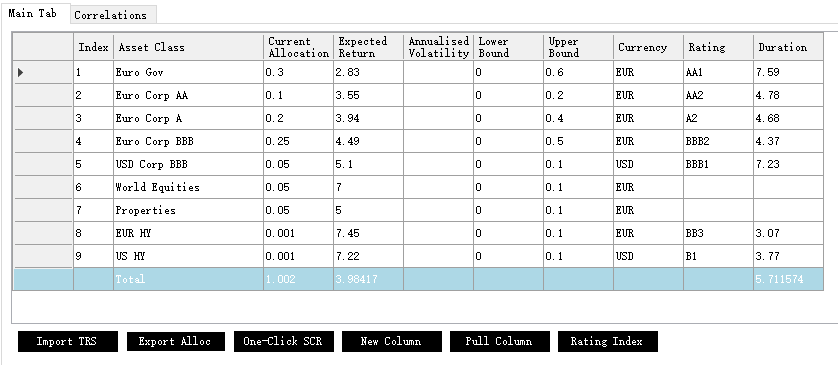
After using either method, the allocation table in the SAA form will look like this:
The allocation table is fully editable, subject to the following validation checks during import and editing:
- Index and Asset Class must be unique and non-empty.
- The "Total" row cannot be edited.
- Expected Return must be numeric and non-empty.
- Current Allocation, Lower Bound, and Upper Bound must be numeric and non-empty (negative values allowed for short positions).
- Lower Bound must not exceed Upper Bound.
- Annualised Volatility and Duration must be numeric and positive or left empty.
- Currency must be a valid three-letter code and non-empty.
- Rating must fall within valid rating expressions.
- The entire table is checked upon import.
Rows and columns can be drag-and-dropped, except for the "Total" row.
Columns Explained
The following columns are auto-added if not provided:
"Lower Bound": Defaults to 0 for all asset classes."Upper Bound": Defaults to twice the current value, rounded to the nearest 5%, with a minimum of 5%."Annualised Volatility": Populated in the next step after importing total return series for the asset classes.
The calculator supports long/short positions. If entering short positions, ensure appropriate lower and upper bounds are defined.
Additional columns, such as ESG scores or carbon emission intensity, will be imported if present in your spreadsheet.
You can also add custom columns using the "New Column" button.


